For many of us, owning a full-motion sim racing rig is a distant dream, as prices can be truly astronomical. However, where there’s a will, there’s a way, and it is certainly possible to make your own for a fraction of the price, but making your own cheap sim racing motion setup takes planning.
To make your own cheap sim racing motion setup, you will need to source both materials to craft the cockpit as well as motors and electrical parts to create the motion effect. You will also need a substantial workspace as well as the tools needed to bring all of the components together.
Bear in mind that crafting your own sim racing motion setup is still unlikely to be a cheap process, requiring a lot of resources. However, it will still most likely be a lot cheaper than buying a pre-made package. Below, we’ll discuss how you can go about making your own motion setup.
How Much Does A Motion Sim Rig Cost?
A motion sim rig will cost around $3,000, with prices going upwards of $20,000. These will contain additional features, such as elevated platforms. Some platforms can even go for well over $100,000. The priciest ones are close to those that professional racing teams utilize.
Motion setups are often the most expensive pieces of sim racing hardware that you can get your hands on, with new products usually starting at around $3,000. Such is the complexity of some motion setups that they can cost upwards of $20,000, containing features such as elevated platforms to give the user a heavily increased range of motion.
There are some motion platforms that sell for over $100,000. These are close in performance to the simulators that professional racing teams use and are available for home installment. This is obviously unattainable for most people, but it certainly demonstrates how much it is possible to spend. Below are some examples of the cost of motion simulators from all points of the price spectrum.
Next Level Racing Motion Platform V3
This motion platform by Next Level Racing is one of the most popular ‘cheaper’ motion setups because the results it offers seem to outweigh the price you have to pay. It is available for around $3,000, depending on the retailer and whether you get it new or second-hand. It’s also not an overly large product, so you won’t have to clear out a whole room just to fit it in.
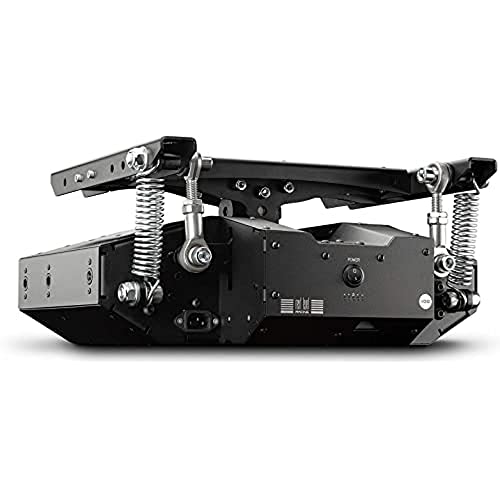
This is a great option for those looking to try their first dedicated sim racing motion setup. It has a comparatively small form factor and is made from durable, high-quality materials.
As it’s very low to the ground, it won’t offer quite the range of motion that you see in more expensive motion platforms, but it does produce consistent and accurate results and would be a very worthwhile addition to any setup. Despite it being on the cheaper end of the scale, it still offers the player a considerable amount of immersion, proving what can be achieved without spending tens of thousands.
Fasetech RacingCUBE RC4-CR
The RacingCUBE is another great lesson in how to create a product with performance levels that defy its price. It isn’t cheap, but at around $8,500, it sits in the mid-range for sim racing motion platforms. It features 4 degrees of freedom (4DOF), meaning you’ll get a realistic range of movement, something that is well worth looking into when building your own.
The bottom of the platform is cased in metal, unlike many motion rigs, which tend to leave their framework exposed. This is likely going to be more of a personal preference thing when building your own, although there will be some stability upsides in building a product with more metal reinforcement on its underside.
Qubic System QS-S25 Ultimate 6DOF Motion Simulator
Priced at around $21,000, the Qubic QS-S25 offers users 6 degrees of freedom (6DOF), a feature that is commonplace in high-end simulator platforms. The seat is elevated and attached to pullies, meaning it will be capable of moving you all over the place! It’s essentially the feature that you’ll pay the big bucks for, generating incredible immersion.
Another expense that comes with 6 degrees of freedom is the sheer number of components required to build the elevated platform. The QS-S25 has countless nuts and bolts holding it together, as well as a lot more metal than a standard motion platform for reinforcement purposes. The same rule applies when building your own, as more resources used means more money spent.
Although totally out of reach for most people’s budgets, there is a lot to learn from these expensive platforms to take into your own build. Features such as seat elevation will help to give you more movement options, especially compared to cheaper, close-to-the-ground platforms. Features like the quality of metal used will also help with durability and stability, which is equally important.
DIY Motion Platforms
If you’re willing to go down the DIY route, then there is a high chance – if you’re strategic – that you’ll be able to save yourself a substantial amount of money. Homemade motion platforms aren’t easy to build, but if you’re handy with tools, then it’s possible and a lot more satisfying when you have the finished product. They’re also a lot more customizable than a shop-bought platform.
Homemade platforms can cost between $1,000 and $2,500, depending on how complex you want your product to be. If you want to build a 6DOF platform, then you’ll likely be spending upwards of $5,000. Not cheap, but a lot more affordable than most pre-made 6DOF platforms. There are two factors that hike up the price: the materials for the structure and the electrical components that get things moving.
The other main cost will be time, as building a motion platform is a full scale project rather than just throwing a few components together. You will need to make a note of the most important components that go into making a fully functioning motion platform, as well as make sure you are able to source them.
Items Required To Make Your Own Motion Setup
Items To Look For
- Metal/wood (for framework)
- Nuts, bolts, and screws
- Wiring
- Electronics/Motors
- Actuators
- Controller board
- Motor driver
- Emergency stop button
- Tools
Less Important Items
- 3D printer
- External fan
- Rubber stoppers
A sim racing motion platform doesn’t have to consist of exclusively high-tech futuristic components, instead relying on strategically placed motors on a metal framework. The difficulty lies not within the complexity of the individual parts but instead within the number of parts required to make the platform work. For a start, you’ll need to stock up on nuts, bolts, and screws.
Metal/Wood
Much of this project will involve working with metals, especially if you are looking at building a strong and durable product. Aluminum and steel will likely be the most reliable and easy-to-source metals on the market, and they offer strength as well as being lightweight enough to move the platform around when the project is complete.
Steel is a cheaper metal than aluminum, so if you are looking to craft the cheapest possible setup, then it will likely be the first-choice metal to use. It is also a hard metal, which will make it more durable and long-lasting. To further cut the cost, you could even make the base for your platform out of wood. Just be sure to check that the wood is strong enough to hold your weight.
Electronics/Motors
The electronics and motors will ultimately be the factor that creates the motion in your simulator. You will need to start by purchasing actuators, which are devices that convert energy and signals into motion. Cheaper actuators can cost between $50-$200. You’ll likely need at least two actuators to ensure you have a minimum of 2DOF, with higher DOF requiring more actuators.
You will need motors to run your motion simulator, as they will generate the power for the actuators to create movement. As well as the motors, you’ll need an adequate supply of wiring to connect everything together. This will ensure your motors, actuators, and control panels will be working in tandem.
To power your motors, you’ll need a motor controller, a small panel with electrical chips that acts as an interface distributing power and signals to your motors. The Arduino IBT-2 is one of the most popular motor controllers on the market and won’t cost you too much.
A functioning emergency stop button, although technically optional, is a very useful addition to the setup, just in case the movements get that little bit too heavy.
Tools
When crafting your motion platform, you’ll require some basic tools to get the job done. Screwdrivers, preferably powered ones to speed up the process, will be essential. If you’re making the framework from scratch, then you’ll need a strong saw capable of cutting through metal. A soldering iron with gloves and a helmet may also be required in order to connect your wiring.
It will greatly help the project if you do have a decent-sized workspace to operate in, rather than trying to complete the platform inside the house. It is likely to be a spark-filled, potentially dusty project, so coverings and good ventilation are key.
Optional Extras
There are many items that you don’t necessarily need but can help with the project, including a 3D printer. This is something that may go over the heads of many, but it allows you to print parts with an incredible degree of accuracy. It will also reduce the risk of ordering certain parts that don’t match up with the rest of the project. Some 3D printers are available for under $300.
Other optional extras include keyboard trays, which will mean you can place your keyboard within a comfortable arm’s length of you. Quality-of-life options such as a cup holder or a fan will be useful for comfort when racing, especially as racing in a motion simulator can be exhausting, especially if you have no air blowing in your face. Cool air can also help to eradicate any motion sickness.
You’ll also need to ensure that you have items such as caster wheels and rubber stoppers for ease when moving your platform and to stop it from sliding when you are using it. Wheels will also be a fundamental part of your setup’s motion ability, as attaching them to the base of your seat platform will be an option for allowing side-to-side and forward-to-back movement.
How To Make A Cheap Sim Racing Motion Setup
When building a cheap sim racing motion setup, a lot of the process and how the structure of the setup is laid out will be down to the individual and what they want to achieve from their efforts. A good place to start is to work out what material you are going to use for crafting the cockpit. For durability and stability, a cost-effective metal such as steel would be recommended.
In order to save money, it’s likely you’ll want to build either a 2DOF or 3DOF motion simulator, which will require fewer electrical and mechanical components than a full 6DOF setup. A 2/3DOF setup will still offer you enhanced levels of immersion that a standard sim rig won’t be able to achieve.
Building The Framework
The easiest way to create a motion simulator rig would be to use two metal frames, with one as a base to stabilize the rig to the floor and a second smaller frame to which you’ll attach the seat. You’ll want to measure the second frame in accordance with the width of your seat, with the base frame being wider to allow the smaller frame to slot inside comfortably.
Choosing Your Frame Size
Crafting the rig with metal frames rather than metal sheets means you’ll be using fewer materials, therefore keeping the overall cost of the project down. Due to the way the frames will be measured, there won’t be any compromise on sturdiness. Everybody’s frame sizes will be different, depending on the individual’s width requirements and distance to the pedals from the seat.
A useful addition to the framework would be an adjustable seat mount, so you can move the seat closer to or further from the pedals. Another option for the framework could be to purchase a pre-made sim cockpit and fit your motors and electrics around the pre-existing setup, although you’ll have fewer customization options than if you were to start from scratch.
If you do decide to go for the two-frame method, you’ll have to attach the frames from the front and then add a joint to the back of the seat frame in order to raise it from the base frame. You can then start to attach wheel mounts and pedal holders to the front of the cockpit, before you begin to implement the motors and other electricals.
Implementing The Electronics
Once you have your seat mounted on the frame, you’ll be able to add the motors to the back of the base frame behind the seat. For a 2DOF setup, you’ll want to have two motors, with one working on the push/pull effect and another capable of moving you from side to side. You’ll need to have a stable mount for the motors that won’t break under pressure from the movement.
Getting the motors working will take a bit of research into electronics, as well as requiring some soldering to attach the wires. This is where your drivers and control panel will come into use, connecting the power source to the actuators, generating power for the motors. Once you have all these aspects working together, you can connect them to a frame at the back of your seat.
From here, you will need to make sure that your setup will work with your game of choice. To do this, you can download a software called SimTools which will provide a link between the game and your motion simulator. It can link up to most motor interfaces, including Arduino and SimAxe, extracting data from them and transferring it into the game.
From here, you should be able to use your simulator perfectly well, producing a realistic and immersive racing experience.
Note: Clearly building your own sim racing motion setup is not for everyone. It’s best to only take on a project like this if you have experience working with the tools and materials required, as for most sim racers, saving up some cash to buy your own is the far easier option!
The Costs Of Building Your Own Sim Racing Motion Setup
Compared to buying a ready-made motion simulator, making your own will likely be far less expensive. Although it won’t be cheap, especially after purchasing the more complex electrical parts, it should still save you a substantial amount of cash. Reducing the number of resources you use will be the best way of saving money, as well as buying smaller parts in bulk.
Smaller Parts
Smaller parts such as nuts, bolts, and screws can be purchased in multipacks from most hardware stores, and for a project such as this, it may come to over $150 in total. The good thing is, when buying in bulk, you will be able to accumulate spare parts in case you need to refurbish your project in the future. It is, after all, better to have too much than too little when starting a project like this.
Costs can quickly add up when purchasing parts such as caster wheels, rubber stoppers, and extra brackets. Other extras like keyboard trays, cup holders, and fans will also add to the price, so be sure to factor these into your budget.
Main Parts
The motors and motor drivers and controllers will make up a big chunk of the cost, costing around $1,000 altogether if you want to buy good-quality, reliable products. Motors don’t come cheap but being able to source them yourself will help you minimize costs. The actuators will also set you back around $50-$200, which isn’t bad considering their importance in the setup.
The framework itself will also cost a fair amount, especially if you opt for a metal chassis. The price of steel frames depends on where you’re sourcing them from, with second-hand metal being cheaper. Ready-made, sturdy, motion simulator-ready cockpits can be purchased for around $650.
Overall, the main section of a DIY motion simulator will likely cost you just under $2,000. This isn’t cheap by any stretch of the imagination, but compared to pre-made simulators, it can be a more cost effective option for those up for the challenge.
Final Thoughts
Building your own cheap sim racing motion setup requires you to find all of the materials you need, alongside a large variety of tools to put everything together. Provided that you can do it, you can save yourself quite a large sum of money over buying a prebuilt motion rig.

I created and have been writing on this site since 2019, collaborating with drivers, coaches, engineers and manufacturers to provide you with the most reliable information about motorsport. I also make beautiful car posters and track posters.